Record Templates
EMu has provided a Ditto facility for a long time. The
Ditto mechanism allows users to extract information from an
existing record and copy it into one being inserted. The data extraction can
occur at the field, tab or whole record level. While this facility is useful
for adding similar records, it does have some short comings:
- A new insertion must be started for each record created.
- Only single fields, tabs or the complete record can be
extracted.
- Incrementing numbers, such as Accession or Registration numbers, must
be entered for each record.
- A series of records with consecutive numbers is difficult to
create.
EMu also provides a Default Values facility that allows a
collection of fields to be initialised with values when commencing a new
record. Users can define a number of Default Values templates
and select one to be used when the next insertion is initiated. While
Default Values can be defined for any field, it is not possible
to extract data from existing records.
KE EMu 4.0.01 sees the introduction of the Record Template
facility. This combines the functionality of the Ditto
and Default Values facilities. Key functionality includes:
- A number of records can be created in a batch and added to a set of
one or more currently listed records.
- An optional starting IRN can be specified, allowing consecutive
IRNs to be allocated.
- Data can be extracted from the current (source) record and added
to created records. Data may be mapped from one field in the source
record to another field in the created record.
- A starting number and incrementation can be specified, allowing a
range of consecutive values to be allocated.
- A wizard is provided to walk through the process.
- A report is generated listing the IRN and incrementing numbers
allocated for each record created.
- An XML based template description is used to specify what data is
placed in created records.
Some useful applications of the Record Template facility
include:
- Creation of part records for an existing object record.
- Insertion of preparation records for a specimen record (e.g.
tissue samples).
- Reserving a block of IRNs or registration numbers.
In the next section we will look at how to use the new facility,
followed by how to set up your own templates.
The Record Template
facility can be used to create a batch of records
based on an existing record.
- As the purpose of the Record Template
facility is to create a series of
records based on an existing record, the first step is to retrieve
one or more records. Any means may be used to retrieve the record to
be used as the source record (the record from which values
are to be extracted). Once a matching set of records is retrieved,
make the source record the current record. The current record is
identified differently depending on the display mode:
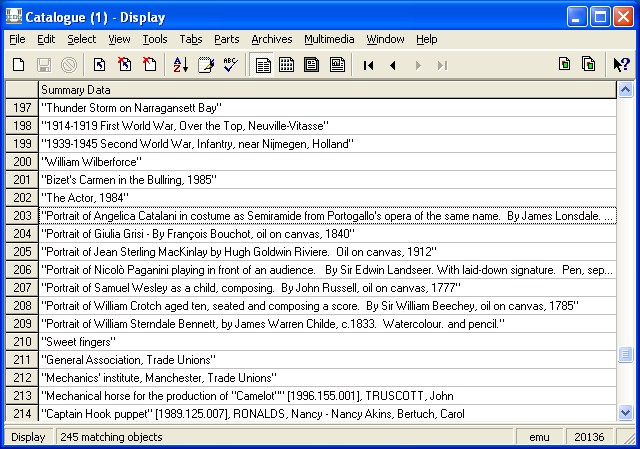
List Mode
The current record is enclosed in a dotted rectangle. In this
example, record number 203 is the current record:
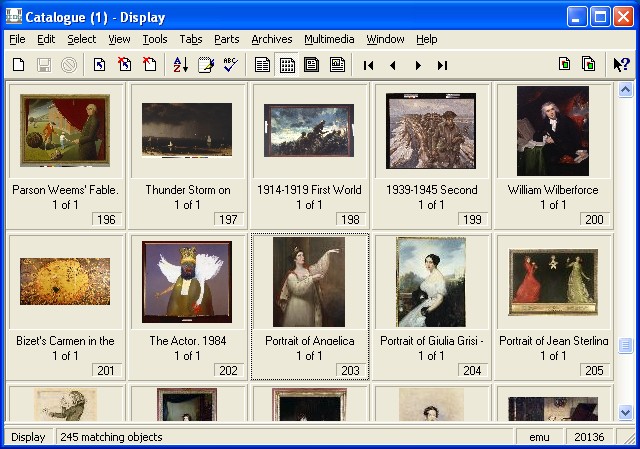
Contact Sheet Mode
A dotted rectangle appears around the image and label of the
current record. Image number 203 is the current record:
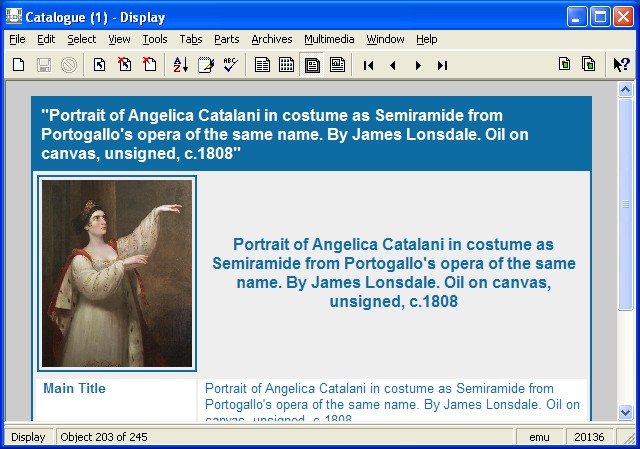
Page View Mode
The current record is the displayed record:
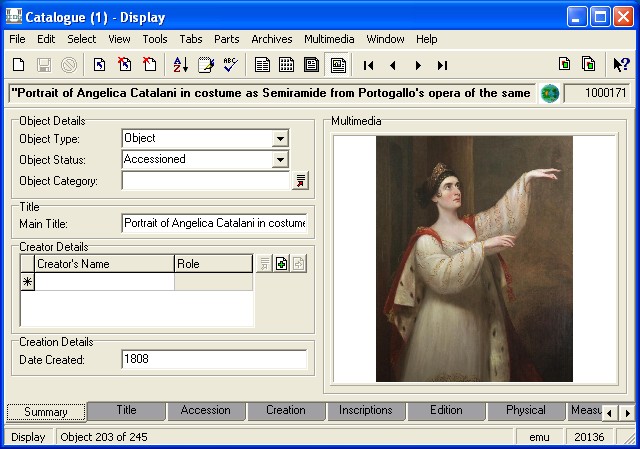
Detail Mode
The record displayed is the current record:
- Select Tools>Templates in the Menu bar
-OR-
Use the keyboard shortcut, ALT+T+M.
The Record Templates box displays with a list of pre-defined
entries:
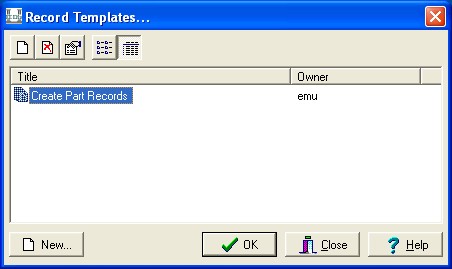
- Select a Record Template from the list and select
OK
 .
.
The Record Template Wizard displays:
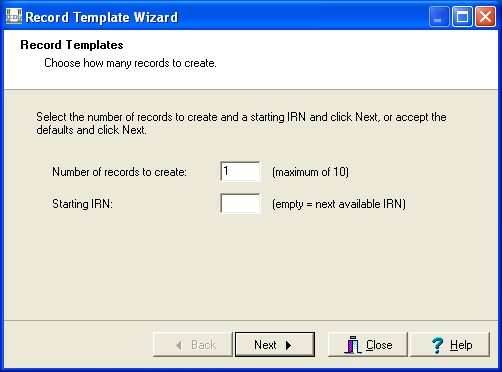
Specify the following:
-
Number of records to create
Enter the number of records to be created when the
wizard is completed. A record template may have a maximum
number of records that may be created. The limit is set
by the creator of the template. If a limit has been set, a
hint will appear next to the box into which the record
count is entered.
-
Starting IRN
Enter the IRN (Internal Record Number) of the first
record to be created. Subsequent numbers will be given to
each new record. If a starting IRN is not specified, the
next available number will be used. A template creator
may choose to hide this setting, in which case the next
available number is always used.
- Select Next
 to continue.
The Input Values screen is displayed:
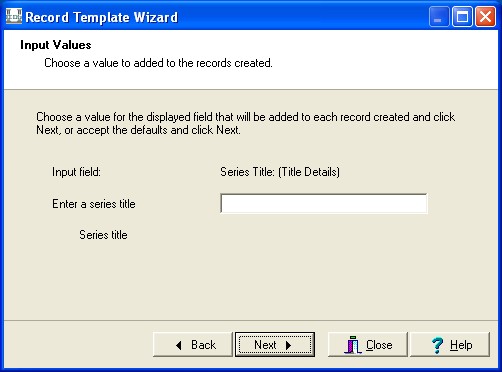
The Input Values screen allows entered data to be inserted
into the records created. The exact layout of the screen will
vary depending on what information the template creator wants to
gather. The screen has four areas:
-
Input field
The EMu field into which the entered value will be
added. The text displayed is the prompt of the field
followed in brackets by the tab on which it appears.
-
Input prompt
To the left of the input box a prompt can be found
indicating the type of value to be entered (Enter a
series title in the picture above). The creator of
the template specifies what prompt should be
displayed.
-
Input box
Enter the value to be inserted in the record created.
The input box may be single or multi-lined as defined by
the template creator. The creator may also indicate what
type of data should be entered (text, integer or float)
and whether a value is mandatory.
-
Input help
A help message defined by the template creator
designed to provide more information about, and examples
of, the input value (Series title in the picture
above). The input help is optional and will not appear on
the Input Values screen if not defined by the template
creator.
- Select Next to continue.
A number of Input Value screens may be displayed depending on
how many input values are required for the created records. Input
values may also be used to request the starting value for fields
that contain incrementing data. For example, a Registration
Number may consist of the current year followed by a number
within the year (e.g. 2008.23, 2006.154, etc.). An input value may
ask for the year on one screen and the starting number within the
year on the next screen. When the records are created, numbers
will be allocated sequentially from the starting number for the
supplied year. Using this mechanism it is easy to pre-allocate a
batch of Registration Numbers to a set of records.
- Select Next to move through all the Input
Value screens.
The Settings screen is displayed:

A summary consisting of the number of records to be created,
the starting IRN and any input values is displayed for
confirmation before the records are created.
- Select Next to continue.
The Creating screen is displayed:
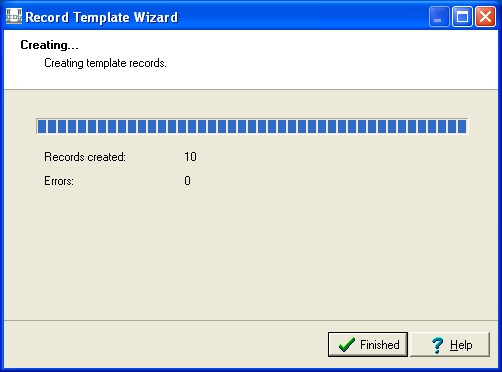
The records are now created. A gauge provides a visual
indicator of creation progress. The number of records created and
the number of errors encountered are also displayed.
If an error occurs, the creation process is halted and a
message displayed:
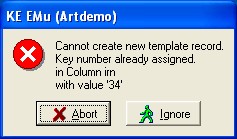
Select Abort  if the creation process is to end
without further records being created
if the creation process is to end
without further records being created
-OR-
Select Ignore  to move on to the creation of
the next record.
to move on to the creation of
the next record.
- Select Finish
 once the records are created.
The Completed screen is displayed:
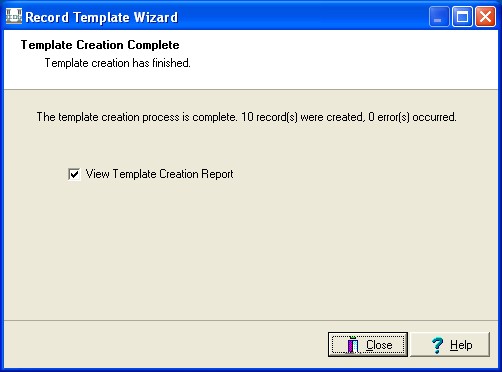
Specify the following:
- Select Close
 to finish the
creation process. Once the button is selected the report is displayed if
required:
to finish the
creation process. Once the button is selected the report is displayed if
required:
Template record creation started 25 Jun 2008 13:27:26
Number of records to create: 5
Starting IRN: Next available IRN
Input field "Series Title: (Title Details)"
    Value: The Badenov Series
Input field "Notes"
    Value: 1
    Increment By: 1

Record 1, created (irn: 35)
Record 2, created (irn: 36)
Record 3, created (irn: 37)
Record 4, created (irn: 38)
Record 5, created (irn: 39)

Number of errors: 0
Number of records created: 5
Template record creation finished 25 Jun 2008 13:27:30
The entry for each record created may vary as the template
creator may include data from the created records (e.g.
Registration Number).
The records created are added to the records currently displayed . They are placed immediately after the current record,
so that moving forward a record will display the first of the new records.
The creation of a Record Template requires producing an XML
description that details:
- Which fields are to copied from the source record.
- Which input values are to be specified when the template is
used.
- The maximum number of records to be created.
- Whether a starting IRN may be specified.
- What data to show for each record created in the template
report.
To be able to create a Record Template in a module a user must have
(or be a member of a group that has) the daTemplates permission
set for the table.
- Search for or otherwise list a group of records.
- Select Tools>Templates in the Menu bar
-OR-
Use the keyboard shortcut, ALT+T+M.
The Record Templates box displays with a list of pre-defined
entries:
- Select New
 .
.
The Record Template Properties box displays:
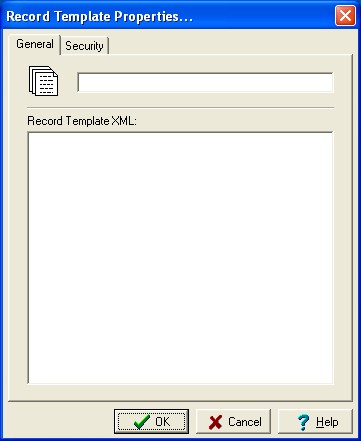
- Enter a descriptive name for the Record Template in the top text
field.
- In the Record Template XML area enter the XML
description for the Record Template.
The XML format is covered in
detail in the next section.
- If required, select the Security tab to give other
users permission to use this Record Template:
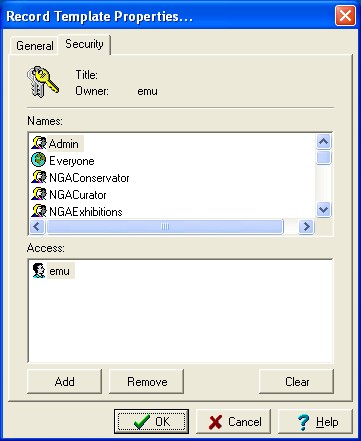
- Select users/groups from the Names list who are
to have access to this Record Template.
- Select Add
 .
.
Continue to select all users/groups who are to have
access to this record template.
- Select OK .
Your new Record Template is added to the Record Template
list.
- Select Close to return to your matching
records
-OR-
Select OK to use the new Record Template.
The description of a Record Template is an XML document. The
complete structure is:
<template maxrecord="number" setIRN="yes|no">
    <tuple>
        <atom name="colname">  <!-- atomic value - repeatable -->
            text
            <source name="colname" rows="rowlist" nestedrows="rowlist"/>
            <input type="text|integer|float" cols="number" rows="number" increment="number" mandatory="yes|no">
                <prompt>
                    text
                    <source name="colname" rows="rowlist" nestedrows="rowlist"/>
                </prompt>
                <help>
                    text
                    <source name="colname" rows="rowlist" nestedrows="rowlist"/>
                </help>
                <value>
                    text
                    <source name="colname" rows="rowlist" nestedrows="rowlist"/>
                </value>
            </input>
            <records/>
            <number/>
        </atom>
        <table name="colname">  <!-- nested or double nested table - repeatable -->
            <tuple>  <!-- nested table - repeatable -->
                <atom>
                    <!-- as for atom above -->
                </atom>
            </tuple>
            <tuple>  <!-- double nested table - repeatable -->
                <table>
                    <source name="colname" rows="rowlist" nestedrows="rowlist"/>
                    <tuple>  <!-- nested table - repeated -->
                        <atom>
                            <!-- as for atom above -->
                        </atom>
                    </tuple>
                </table>
            </tuple>
            <source name="colname" rows="rowlist" nestedrows="rowlist"/>
        </table>
    </tuple>
    <report>
        text
        <column name="colname"/>
    </report>
</template>
While the XML may look complex, the main part is the
specification of the fields that require values to be set. The format of
the XML for this part is exactly the same as that generated by the EMu
XML Export facility, which is the same as that used by the EMu XML Import
tool. Using this same structure means a skeletal XML record can be
generated by building a report with the required fields and
producing an XML Export file. Once you have the skeletal XML it can be
expanded to include any additional options required.
A quick summary of the XML structure used by the three kinds of fields
in EMu may make things clearer. The three field kinds are:
- atomic
- nested table
- double nested table
Atomic Fields
An atomic field contains a single value. It is represented by a single
data entry area in the EMu client. The XML snippit used to represent an
atomic value is:
<atom name="colname">value</atom>
where colname is the name of the field and value is
the contents of the field.
Nested Table Fields
A nested table field contains a list of values. A grid is used to
display the list in the EMu client. The XML format for a nested table
is:
<table name="colname">
    <tuple>
        <atom>value 1</atom>
    </tuple>
    <tuple>
        <atom>value 2</atom>
    </tuple>
    ...
</table>
where colname is the name of the field and value 1,
value 2 etc. are the values in the list. There is no limit to the number of
<tuple> entries in a nested table.
Double Nested Table Fields
A double nested table field consists of a list where each entry is itself a list.
The EMu client uses the nested form construct
(where a gird at the bottom of the tab controls what data is shown) where
a grid is displayed in the top part of the tab. The XML required for a
double nested table is:
<table name="colname">
    <tuple>
        <table>
            <tuple>
                <atom>value 1-1</atom>
            </tuple>
            <tuple>
                <atom>value 1-2</atom>
            </tuple>
            ...
        </table>
    </tuple>
    <tuple>
        <table>
            <tuple>
                <atom>value 2-1</atom>
            </tuple>
            ...
        </table>
    </tuple>
    ...
</table>
where colname is the name of the field and value
1-1, value
1-2 etc. are the list of values in the first list, value
2-1, value 2-2 etc. are the list of values in the second list and so on. There
is no limit to the number of values in any of the lists.
An example record
When specifying a record the three field types are enclosed within
<tuple></tuple> tags. Let's consider an example
where we are to encode the data in the following record:
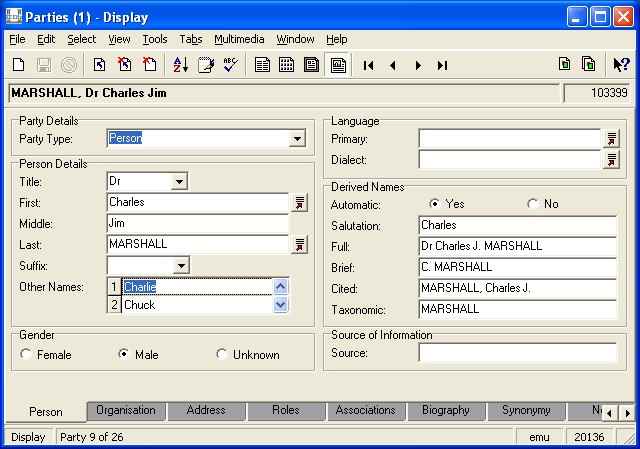
The XML below represents the data entered by a user and does not
include computed values (found in the Derived Names group box
when Automatic is set to Yes):
<tuple>
    <atom name="NamPartyType">Person</atom>
    <atom name="NamTitle">Dr</atom>
    <atom name="NamFirst">Charles</atom>
    <atom name="NamMiddle">Jim</atom>
    <atom name="NamLast">MARSHALL</atom>
    <table name="NamOtherNames_tab">
        <tuple>
            <atom>Charlie</atom>
        </tuple>
        <tuple>
            <atom>Chuck</atom>
        </tuple>
    </table>
    <atom name="NamSex">Male</atom>
    <atom name="NamAutomatic">Yes</atom>
</tuple>
Fields that do not contain a value are not specified. You
may include empty values if you want to remove any data already in the
field (e.g. a default value added when an insertion is commenced). An
empty value consists of a tag of the form:
<atom name="colname"/>
We will now examine each of the tags that may be used to specify a Record
Template in detail:
template tag
The <template> tag encloses the Record Template XML
description. It must be the first tag and the corresponding closing tag
</template> must be the last tag. Attributes associated
with the tag represent options available when the template is used.
Attributes
maxrecords- Specifies the maximum number of records that may be generated
using this template. If a number is given, a hint is displayed next to
the Number of records to create input box. If the attribute
is not specified, no limit exists on the number of records that
can be created.
setIRN- Indicates whether a starting IRN may be entered when the Record
Template is used. If a value of
no is supplied, the
Starting IRN prompt and input box are removed from the
Record Template Records screen. The default value is
yes.
Contains
<tuple>
<report>
Contained within
None
source tag
The <source> tag extracts information from the
source record (the current record). The tag is replaced with the value(s)
extracted. Data can be extracted from any field kind (atomic, nested
table and double nested table) into any field kind. Where a mismatch
between the field kinds occurs the data is either converted to a newline
separated value (when going from a table to an atomic field) or wrapped
in table XML (when going from an atomic value to a table). Using
attributes it is possible to extract parts of tables or double nested
tables.
Attributes
name- Specifies the name of the column from which the value is to be
extracted. The name attribute is mandatory.
rows- Contains a list of numbers indicating which rows should be
extracted from a nested table. The list is a comma separated set of
numbers or ranges. An example list setting is
rows="1,3-5,7-" which indicates that rows one, three to
five and seven onward are to be extracted. If this attribute is not
specified, all rows are extracted.
nestedrows- Contains a list of rows indicating which of the outer rows in a
double nested table are to be extracted. The format of the row list
is the same as for the rows attribute. The rows
attribute is used to specify the inner row numbers to be extracted.
The default is to extract all nested rows.
Contains
None
Contained within
<table>
<atom>
<prompt>
<help>
<value>
input tag
The <input> tag indicates that the user should be
asked to enter a value when the Record Template is used. The tag is
replaced with the value entered. Each <input> tag
found in the Record Template description produces an Input Values
screen when the template is used.
Attributes
type-
Defines the type of data the user may enter. The available types
are:
When the user moves out of the input box a check is made to
ensure a legal value has been input. The default type is
text.
cols- Indicates the width in characters of the input box displayed on
the Input Values screen when the template is used. The number does
not limit the length of the value that may be entered. The default
is 8.
rows- Specifies the number of rows the input box should display on the
Input Values screen when the template is used. Users may enter more
lines than the number specified. The default
is 1.
increment- Indicates that the value entered should be incremented by the
increment amount after each record is created. For example, setting
increment="1" would increase the value entered by the
user by one for every record created.
mandatory- Determines whether an input value must be specified. A value of
no indicates an empty value is acceptable, while
yes ensures that a value is entered. The default value
is yes.
Contains
<prompt>
<help>
<value>
Contained within
<atom>
prompt tag
The <prompt> tag appears within an
input tag and defines the prompt displayed on
the Input Values screen. The default prompt is Input value.
Attributes
None
Contains
text
<source>
Contained within
<input>
help tag
The <help> tag appears within an input
tag and specifies a help message displayed below the input box on
the Input Values screen. If a help tag is not defined, a help message is
not displayed.
Attributes
None
Contains
text
<source>
Contained within
<input>
value tag
The <value> tag appears within an
input tag and contains the initial value shown in the
input box on the Input Values screen. If a value is not specified, the
input box will be empty.
Attributes
None
Contains
text
<source>
Contained within
<input>
records tag
The <records> tag is replaced with the number of
records to be created.
Attributes
None
Contains
None
Contained within
<atom>
number tag
The <number> tag is replaced with the number of the
record being created.
Attributes
None
Contains
None
Contained within
<atom>
report tag
The <report> tag defines the text to be displayed
for each record created in the Record Template report file. The text
defined should identify the record created uniquely (e.g.
Registration Number).
Attributes
None
Contains
text
<column>
Contained within
<template>
column tag
The <column> tag is replaced with the value in
the specified column name in the created record.
Attributes
name- Specifies the name of the column from which the value is to be
extracted. The name attribute is mandatory.
Contains
None
Contained within
<report>
Example 1
The Record Template XML for our first example is:
<template>
    <tuple>
        <atom name="ObjectType">Object</atom>
        <atom name="TitObjectStatus">Accessioned</atom>
        <atom name="TitAccessionDate"><input cols="15">
            <prompt>Enter the Accession Date:</prompt>
            <help>Enter the date on which the works were accepted into the collection.</help>
        </input></atom>
    </tuple>
</template>
The template is used to create accessioned object records in the
Catalogue module. A suitable title would be Create Accessioned
Objects. The following values are set in the records created:
Object in the ObjectType field.Accessioned in the TitObjectStatus
field.- Asks for the accession date and sets the TitAccessionDate
field to the value entered.
The Input Values screen used to request the accession date looks
like:
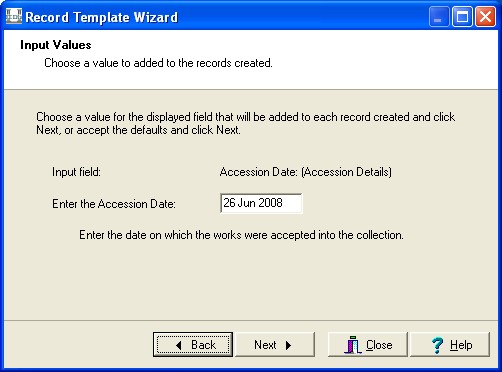
Notice how the input prompt and help use the text specified in the
template XML.
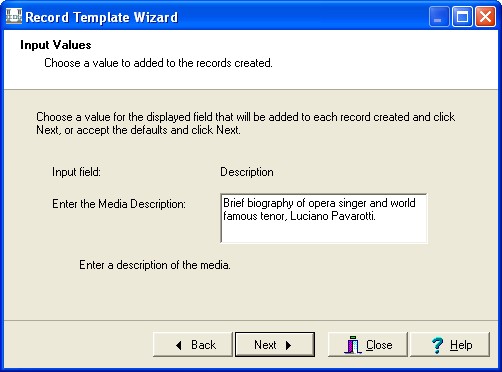
Example 2
In this example we set up a Record Template for the Multimedia
module that copies the Dublin Core fields and asks the user for the
Title, Creator and Description. The input fields do not
have to have a value, but are initialised with the value from the source
record. The maximum number of records to be created will be set to 10 and
a starting IRN cannot be specified. The following Record Template XML is
suitable:
<template maxrecords="10" setIRN="no">
    <tuple>
        <table name="DetSubject_tab"><source name="DetSubject_tab"/></table>
        <table name="DetContributor_tab"><source name="DetContributor_tab"/></table>
        <table name="DetLanguage_tab"><source name="DetLanguage_tab"/></table>
        <table name="DetRelation_tab"><source name="DetRelation_tab"/></table>
        <table name="DetDate0"><source name="DetDate0"/></table>
        <atom name="DetResourceType"><source name="DetResourceType"/></atom>
        <atom name="DetPublisher"><source name="DetPublisher"/></atom>
        <atom name="DetCoverage"><source name="DetCoverage"/></atom>
        <atom name="DetSource"><source name="DetSource"/></atom>
        <atom name="DetRights"><source name="DetRights"/></atom>
        <atom name="MulTitle"><input cols="30" mandatory="no">
            <prompt>Enter the Media Title:</prompt>
            <help>Enter the title of the media.</help>
            <value><source name="MulTitle"/></value>
        </input></atom>
        <table name="MulCreator_tab">
            <tuple>
                <atom><input cols="30" mandatory="no">
                    <prompt>Enter the Media Creator:</prompt>
                    <help>Enter a description of the media.</help>
                    <value><source name="MulCreator_tab" rows="1"/></value>
                </input></atom>
            </tuple>
        </table>
        <atom name="MulDescription"><input rows="3" cols="40" mandatory="no">
            <prompt>Enter the Media Description:</prompt>
            <help>Enter a description of the media.</help>
            <value><source name="MulDescription"/></value>
        </input></atom>
    </tuple>
</template>
Notice how the first value of the MulCreator_tab table is
extracted as the default value for the media creator. The picture below
shows the Input Values screen for media description:
Example 3
The following example shows how the increment attribute
of the <input> tag can be used to allocate Accession
Numbers. The Record Template creates child records linking them to their
parent record. Each child record has an Accession Number allocated that
consists of the parent's Accession Number followed by a dot and the part
number. For example, if the source record's Accession Number is 2007.14
the child numbers will be 2007.14.1, 2007.14.2, etc. The report produced
will list the Accession Numbers created. The Record Template XML is:
<template maxrecords="100">
    <tuple>
        <atom name="TitObjectStatus"><source name="TitObjectStatus"/></atom>
        <atom name="TitAccessionDate"><source name="TitAccessionDate"/></atom>
        <atom name="TitMainTitle"><source name="TitMainTitle"/></atom>
        <atom name="AccAccessionLotRef"><source name="AccAccessionLotRef"/></atom>
        <atom name="AssParentObjectRef"><source name="irn"/></atom>
        <atom name="TitPartNumber"><number/></atom>
        <atom name="TitNumber of Parts"><records/></atom>
        <atom name="TitAccessionNo"><source name="TitAccessionNo"/>.<number/></atom>
    </tuple>
    <report>Accession Number: <column name="TitAccessionNo"/></report>
</template>
Notice how the IRN of the source record is placed in the
AssParentObjectRef field of the created record, creating the parent/child
link. The Record Template report contains:
Template record creation started 26 Jun 2008 11:45:11
Number of records to create: 2
Starting IRN: Next available IRN

Record 1, Accession Number: 2007.14.1 created (irn: 45)
Record 2, Accession Number: 2007.14.2 created (irn: 46)

Number of errors: 0
Number of records created: 2
Template record creation finished 26 Jun 2008 11:45:12